Starwhale的 Helloworld 例子-评测KNN算法在手写体数字识别任务上的效果
本篇教程会从 Starwhale Client 的安装开始,介绍编写评测代码,制作数据集, 在 Standalone 实例上进行调试,并最终在 Server 实例上运行评测的全过程。
基本信息
- 代码链接:https://github.com/star-whale/starwhale/tree/main/example/helloworld
- Starwhale Cloud 示例地址:https://cloud.starwhale.cn/projects/15/overview
- Notebook 链接:Github, Coblab
- 例子复现用时:10-15分钟
- 机器环境:
- 笔记本或开发机环境即可,无GPU需求
- Linux 或 macOS 系统
- Python3.7 ~ 3.11
安装 Starwhale Client
python3 -m pip install starwhale
构建 Starwhale 运行时
Starwhale 运行时提供一系列的 Python 环境定义和重现工具,能够满足机器学习开发、调试对环境方面的需求。制作 Starwhale 运行时典型方式是从编写 runtime.yaml 开始:
name: helloworld  # runtime name
mode: venv        # use virtualenv
dependencies:     # python deps
  - requirements.txt
Helloworld 例子中,我们先定义运行时的名称,并设置Python 隔离环境为venv,最后再增加一些 Python 依赖,就完成了 runtime.yaml 的定义。虽然定义很简单,但 Starwhale 会帮助您在后台做很多关于环境的事情,比如:
- 屏蔽 Docker Image 和 Dockerfile 等细节
- 自动增加 CUDA 和 CuDNN 依赖
- 提供一个满足机器学习开发所需要的,精心优化的Docker Base Image
- 自动锁定所有依赖的版本,确保每次复现环境都是一致的
- 自动锁定 Starwhale Client 版本
- 自动锁定 Python 版本
- 提供 venv 和 conda 两种运行隔离环境供选择
- 提供运行环境的版本控制,并能自由的分享到其他 Starwhale 实例上
接下来,我们一般会执行构建命令,生成一个带有版本号的 Starwhale 运行时:
swcli runtime build --yaml runtime.yaml
执行输出如下:
❯ swcli runtime build --yaml runtime.yaml
🚧 start to build runtime bundle...
👷 uri local/project/self/runtime/helloworld/version/hlp6mixccpi5sdmuoxdstfn5nf5xebu2lac2gz4x
🐦 runtime will ignore pypi editable package
👽 try to lock environment dependencies to /home/tianwei/code/starwhale/example/helloworld ...
🦋 lock dependencies at mode venv
🍼 install runtime.yaml dependencies @ /home/tianwei/code/starwhale/example/helloworld/.starwhale/venv for lock...
🐱 use /home/tianwei/code/starwhale/example/helloworld/.starwhale/venv/bin/python3 to freeze requirements...
🐭 dump lock file: /home/tianwei/code/starwhale/example/helloworld/.starwhale/lock/requirements-sw-lock.txt
📁 workdir: /home/tianwei/.starwhale/self/workdir/runtime/helloworld/hl/hlp6mixccpi5sdmuoxdstfn5nf5xebu2lac2gz4x
🐝 dump environment info...
🥯 dump dependencies info...
🌈 runtime uses builtin docker image: docker-registry.starwhale.cn/star-whale/base:0.3.4  🌈
🦋 .swrt bundle:/home/tianwei/.starwhale/self/runtime/helloworld/hl/hlp6mixccpi5sdmuoxdstfn5nf5xebu2lac2gz4x.swrt
  10 out of 10 steps finished ━━━━━━━━━━━━━━━━━━━━━━━━━━━━━━━━━━━━━━━━ 100% 0:00:00 0:00:00
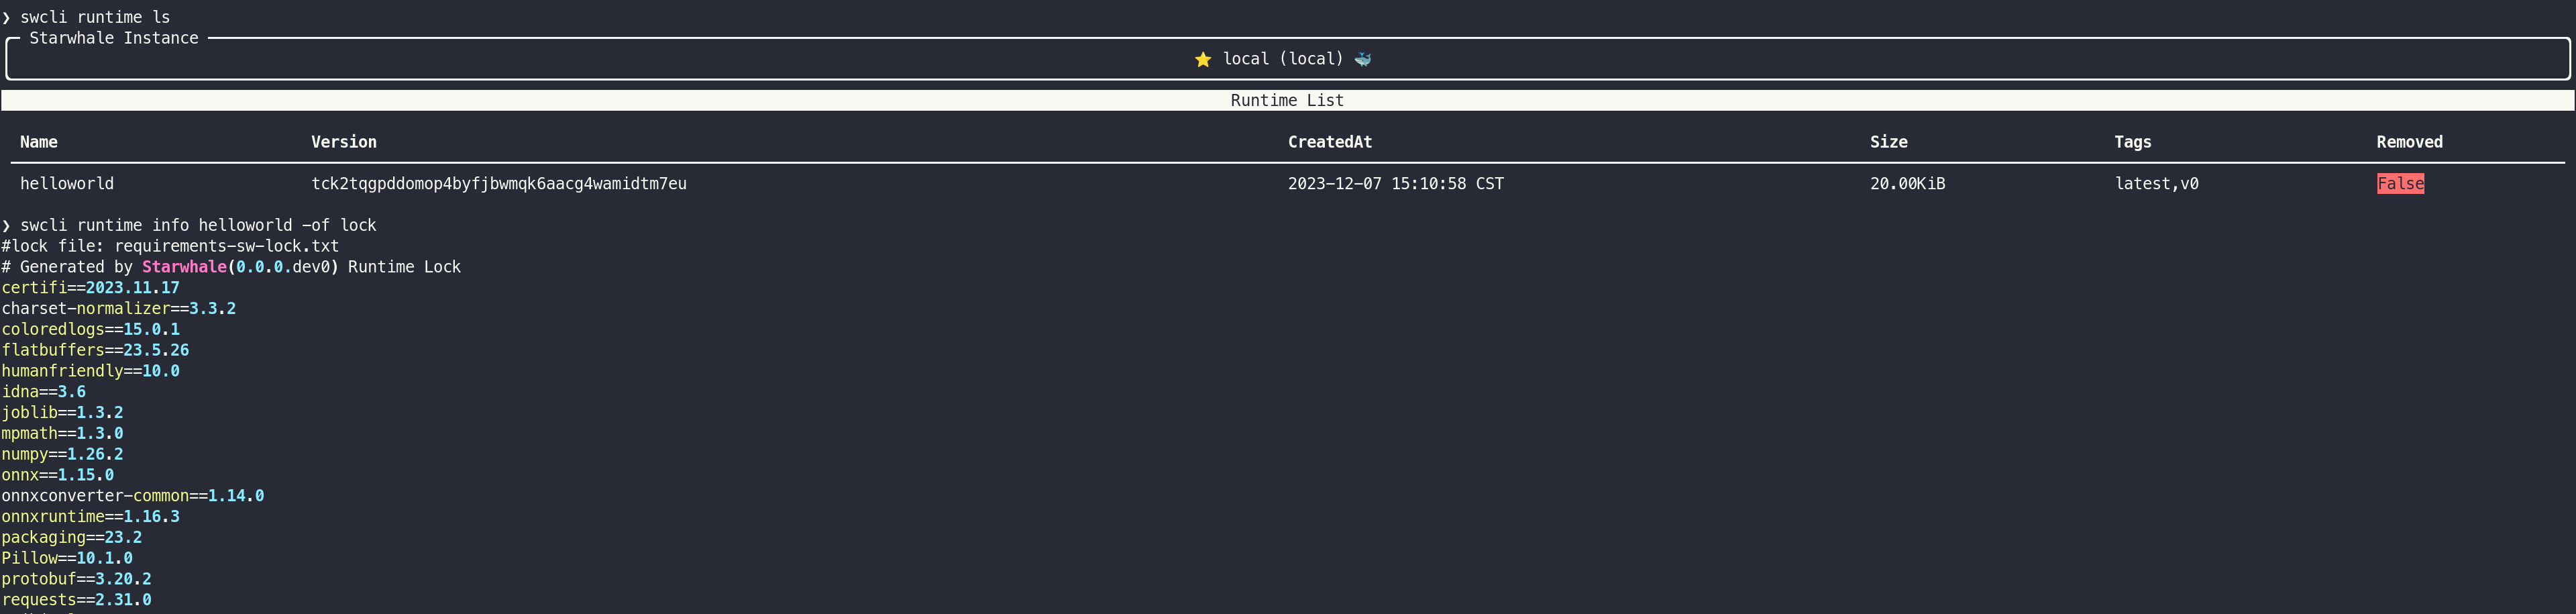
然后可以通过 runtime 一些管理命令来查看版本等信息:
swcli runtime list
swcli runtime info helloworld
我们可以使用构建好的 Starwhale 运行时作为运行环境来执行模型包的构建、数据集构建和模型评测任务等。
构建 MNIST 数据集
MNIST是一个在图像处理任务中被广泛使用的数据集,由一些手写体数字图片组成。本例子中,我们使用 sklearn 库中的 MNIST64 数据集,是一个简化版本的MNIST,包含500张 8*8 像素的图片。
Starwhale 提供一系列针对数据集构建和加载的Python SDK,可以通过少量代码就能构建非结构化的数据集。下面我们看一下 MNIST 数据集构建的核心代码,完整代码参见dataset.py:
import io
from pathlib import Path

import numpy as np
from PIL import Image as PILImage
from tqdm import tqdm

from starwhale import Image, dataset, MIMEType, init_logger

init_logger(3)

# download the raw data
data_dir = Path(__file__).parent / "data"
url = "https://starwhale-examples.oss-cn-beijing.aliyuncs.com/dataset/mnist/digits.csv"
download(url, data_dir / fname)

# build Starwhale Dataset
with dataset("mnist64") as ds:   # <---- define starwhale dataset object
    with (data_dir / fname).open("r") as f:
        data = np.loadtxt(f, delimiter=",")
        targets = data[:, -1].astype(int, copy=False)
        images = data[:, :-1]

        for i in tqdm(range(0, min(500, len(images)))):
            img_2d_array = (np.reshape(images[i], (8, 8)) * 255).astype(np.uint8)
            img_bytes = io.BytesIO()
            PILImage.fromarray(img_2d_array, "L").save(img_bytes, format="PNG")
            ds[i] = {           # <----- append data into dataset
                "img": Image(
                    img_bytes.getvalue(),
                    display_name=f"{i}",
                    shape=(8, 8, 1),
                    mime_type=MIMEType.PNG,
                ),
                "label": targets[i],
            }
    ds.commit()                # <---- commit dataset

print(f"{ds.uri} dataset build done")
构建 Starwhale Dataset 三个步骤:
- 声明 Starwhale Dataset 对象:
with dataset("mnist64") as ds: - 迭代原始数据,添加到 Starwhale Dataset 对象中,类似dict或list添加元素方式:
ds[i]={"img": Image(), ...} - 提交变更,产生数据集版本:
ds.commit()
当执行完数据集构建脚本后,可以通过swcli命令来查看数据集详细信息:
swcli -vvv runtime activate helloworld
python3 dataset.py

另外,Starwhale Dataset 支持完整的Python SDK操作,可以在类似jupyternotebook或ipython等交互环境中进行数据集功能的体验,可以参考dataset sdk例子。
编写模型评测程序
Starwhale 提供一系列针对模型评测的Python SDK,只需要修改少量代码,就能实现分布式的、多数据集的模型评测。Starwhale 一般建议模型评测分为 predict 和 evaluate 两个阶段。每个阶段都可以指定资源使用量,并可以通过 needs 参数设置任务依赖。完整代码参见evaluation.py。
predict 阶段
from starwhale import Image, evaluation

@evaluation.predict(
    resources={"memory": {"request": "500M", "limit": "2G"}},
    replicas=3,
    log_mode="plain",
)
def predict_image(data):
    img: Image = data["img"]
    model = _load_model()
    input_name = model.get_inputs()[0].name
    label_name = model.get_outputs()[0].name
    input_array = [img.to_numpy().astype(np.float32).reshape(64)]
    pred = model.run([label_name], {input_name: input_array})[0]
    return pred.item()
predict 阶段相当于MapReduce架构中的map,是把数据集条目分类到每个 predict 任务上,每个predict任务会分别加载模型,根据数据集输入数据,并完成推理。返回的推理结果会被 Starwhale 自动记录到相关datastore表中,可以在 evaluate 阶段中使用。
evaluate 阶段
from starwhale import Image, evaluation, multi_classification
@evaluation.evaluate(
    needs=[predict_image],
    resources={"memory": {"request": "500M", "limit": "2G"}},
)
@multi_classification(
    confusion_matrix_normalize="all",
    show_hamming_loss=True,
    show_cohen_kappa_score=True,
    show_roc_auc=False,
    all_labels=[i for i in range(0, 10)],
)
def evaluate_results(predict_result_iter):
    result, label = [], []
    for _data in predict_result_iter:
        label.append(_data["input"]["label"])
        result.append(_data["output"])
    return label, result
evaluate 阶段相当于MapReduce架构中的reduce,是把上一阶段 predict 产生的推理结果进行汇总,然后计算一些模型评价指标,最后写入到一些datastore表中,方便做进一步的对比、分析。Helloworld例子是经典的多分类问题,我们可以直接使用 @starwhale.multi_classification 修饰器进行指标的分析,产生 Recall/Accuracy/Precision 等指标。
构建 Starwhale 模型
Starwhale 模型构建过程非常简单,通过 swcli 或 Python SDK 调用模型构建,将相关文件打包生成一个带有版本、可分享、可运行的Starwhale 模型包。
swcli -vvv model build . --name helloworld -m evaluation --runtime helloworld
上面命令会进行如下操作:
- 将
.目录下的文件及子目录文件进行打包,主要是权重文件、Python代码和配置文件等。打包时,会根据.swignore文件决定哪些文件或目录会被忽略。 - Starwhale 模型包自动识别根目录下的
README.md文件,会在 Starwhale Server Web中渲染出来。 - 分析
evaluation模块中的函数定义,生成 Starwhale 模型运行的handler。 - 使用 helloworld 运行时来运行打包过程,由于 Starwhale 模型制作过程中加载代码文件,所以构建模型时使用Starwhale 运行时是推荐的做法。
- 将 helloworld 运行时自动注入到 Starwhale 模型中,变成内建运行时,与模型包共同分发。
- 生成一个带有唯一版本的模型包,可以进行不同实例上的分发。
❯ swcli model build . --name helloworld -m evaluation --runtime helloworld
🦉 start to run in the new process with runtime environment: local/project/self/runtime/helloworld/version/tck2tqgpddomop4byfjbwmqk6aacg4wamidtm7eu
🐌 start to restore runtime: local/project/self/runtime/helloworld/version/tck2tqgpddomop4byfjbwmqk6aacg4wamidtm7eu
🧮 setup python(3.9) env with venv...
👏 create venv@/home/tianwei/.starwhale/self/workdir/runtime/helloworld/tc/tck2tqgpddomop4byfjbwmqk6aacg4wamidtm7eu/export/venv, python:3.9.13 (main, Oct 13 2022, 21:15:33)
🍡 installing dependencies for pip_req_file:.starwhale/lock/requirements-sw-lock.txt in the venv environment
  6 out of 6 steps finished ━━━━━━━━━━━━━━━━━━━━━━━━━━━━━━━━━━━━━━━━ 100% 0:00:00 0:00:30
🐓 run process in the python isolated environment(prefix: /home/tianwei/.starwhale/self/workdir/runtime/helloworld/tc/tck2tqgpddomop4byfjbwmqk6aacg4wamidtm7eu/export/venv)
🚧 start to build model bundle...
👷 uri local/project/self/model/helloworld/version/somjliyhbtqhcldnvnlapwpqsrignyem6ik564vb
📁 workdir: /home/tianwei/.starwhale/.tmp/tmpcihsv20w
🦚 copy source code files: . -> /home/tianwei/.starwhale/.tmp/tmpcihsv20w/src
📁 source code files size: 238.35KiB
💿 package runtime(local/project/self/runtime/helloworld/version/tck2tqgpddomop4byfjbwmqk6aacg4wamidtm7eu) to /home/tianwei/.starwhale/.tmp/tmpcihsv20w/src/.starwhale/runtime/packaged.swrt
🚀 generate jobs yaml from modules: ('evaluation',) , package rootdir: .
  10 out of 10 steps finished ━━━━━━━━━━━━━━━━━━━━━━━━━━━━━━━━━━━━━━━━ 100% 0:00:00 0:00:00
💯 finish gen resource @ /home/tianwei/.starwhale/self/model/helloworld/so/somjliyhbtqhcldnvnlapwpqsrignyem6ik564vb.swmp

Standalone 实例上进行模型评测
上面我们已经完成模型包、运行时和数据集的构建,接下来就可以进行模型评测,检测一些模型评测效果了。Starwhale Standalone 实例是专门为开发调试环境设计的,模型评测也可以现在 Standalone 上用少量数据进行,等代码运行没有问题后,再到 Starwhale Server 或 Starwhale Cloud 实例上运行更大规模的评测数据集。
swcli -vvv model run --uri helloworld --dataset mnist64 --runtime helloworld --dataset-head 10
我们只使用数据集前10条数据进行评测,命令输出如下:
❯ swcli -vvv model run --uri helloworld --dataset mnist64 --runtime helloworld --dataset-head 10
[2023-12-07 16:30:28.334074] 👾 verbosity: 3, log level: DEBUG
[2023-12-07 16:30:28.346034] 🦉 start to run in the new process with runtime environment: local/project/self/runtime/helloworld/version/tck2tqgpddomop4byfjbwmqk6aacg4wamidtm7eu
[2023-12-07 16:30:28.346984] 🐓 run process in the python isolated environment(prefix: /home/tianwei/.starwhale/self/workdir/runtime/helloworld/tc/tck2tqgpddomop4byfjbwmqk6aacg4wamidtm7eu/export/venv)
[2023-12-07 16:30:28.363485] 🔈 |DEBUG| cmd: ['bash', '-c', 'source /home/tianwei/.starwhale/self/workdir/runtime/helloworld/tc/tck2tqgpddomop4byfjbwmqk6aacg4wamidtm7eu/export/venv/bin/activate && /home/tianwei/.starwhale/self/workdir/runtime/helloworld/tc/tck2tqgpddomop4byfjbwmqk6aacg4wamidtm7eu/export/venv/bin/swcli -vvv model run --uri helloworld --dataset mnist64 --dataset-head 10']
[2023-12-07 16:30:29.996979] 👾 verbosity: 3, log level: DEBUG
[2023-12-07 16:30:30.005397] ✈ change current dir to /home/tianwei/.starwhale/self/job/cj/cjas3yao3l5nvfw5hkkx5x7al2d6cgtsabqjirpu/snapshot
[2023-12-07 16:30:30.005850] ⏳ start to run model, handler:0 ...
[2023-12-07 16:30:30.010668] 🏦 runnable handlers:
[2023-12-07 16:30:30.011033]     *  [0]: evaluation:evaluate_results
[2023-12-07 16:30:30.011466]        [1]: evaluation:predict_image
[2023-12-07 16:30:30.012296] 💡 |INFO| start to execute step: Step: handler-evaluation:.predict_image
[2023-12-07 16:30:30.014036] 💡 |INFO| start to execute task: context(step:evaluation:predict_image, index:0/1) step(Step: handler-evaluation:.predict_image, {'name': 'evaluation:predict_image', 'show_name': 'predict', 'module_name': 'evaluation', 'cls_name': '', 'func_name': 'predict_image', 'resources': [RuntimeResource(type='memory', request=500000000.0, limit=2000000000.0)], 'task_num': 1, 'needs': [], 'extra_args': [], 'extra_kwargs': {'dataset_uris': None, 'ignore_error': False, 'predict_auto_log': True, 'predict_batch_size': 1, 'predict_log_dataset_features': None, 'predict_log_mode': 'plain'}, 'expose': 0, 'virtual': None, 'require_dataset': True})
[2023-12-07 16:30:30.036313] 💡 |INFO| start to run _starwhale_internal_run_predict function@evaluation:predict_image-0 ...
[2023-12-07 16:30:30.216042] 💡 |INFO| thread-140277817129088 handle scan-range: (0, 50)
[2023-12-07 16:30:30.237276] 🔈 |DEBUG| new store backendObjectStore backend:StorageBackend for local_fs created for key: local.
[2023-12-07 16:30:30.254205] 💡 |INFO| thread-140277817129088 handle scan-range: (50, 100)
[2023-12-07 16:30:30.297356] 🔈 |DEBUG|  use 0.058s, session-id:cjas3yao3l5nvfw5hkkx5x7al2d6cgtsabqjirpu @evaluation:predict_image-0
[2023-12-07 16:30:30.301059] 💡 |INFO| thread-140277817129088 handle scan-range: (100, 150)
[2023-12-07 16:30:30.301784] 🔈 |DEBUG|  use 0.004s, session-id:cjas3yao3l5nvfw5hkkx5x7al2d6cgtsabqjirpu @evaluation:predict_image-0
[2023-12-07 16:30:30.304711] 🔈 |DEBUG|  use 0.002s, session-id:cjas3yao3l5nvfw5hkkx5x7al2d6cgtsabqjirpu @evaluation:predict_image-0
[2023-12-07 16:30:30.307783] 🔈 |DEBUG|  use 0.002s, session-id:cjas3yao3l5nvfw5hkkx5x7al2d6cgtsabqjirpu @evaluation:predict_image-0
[2023-12-07 16:30:30.311066] 🔈 |DEBUG|  use 0.003s, session-id:cjas3yao3l5nvfw5hkkx5x7al2d6cgtsabqjirpu @evaluation:predict_image-0
[2023-12-07 16:30:30.314291] 🔈 |DEBUG|  use 0.002s, session-id:cjas3yao3l5nvfw5hkkx5x7al2d6cgtsabqjirpu @evaluation:predict_image-0
[2023-12-07 16:30:30.318806] 🔈 |DEBUG|  use 0.004s, session-id:cjas3yao3l5nvfw5hkkx5x7al2d6cgtsabqjirpu @evaluation:predict_image-0
[2023-12-07 16:30:30.323726] 🔈 |DEBUG|  use 0.004s, session-id:cjas3yao3l5nvfw5hkkx5x7al2d6cgtsabqjirpu @evaluation:predict_image-0
[2023-12-07 16:30:30.357769] 🔈 |DEBUG|  use 0.033s, session-id:cjas3yao3l5nvfw5hkkx5x7al2d6cgtsabqjirpu @evaluation:predict_image-0
[2023-12-07 16:30:30.361139] 🔈 |DEBUG|  use 0.003s, session-id:cjas3yao3l5nvfw5hkkx5x7al2d6cgtsabqjirpu @evaluation:predict_image-0
[2023-12-07 16:30:30.463597] 💡 |INFO| evaluation:predict_image-0 received 10 data items for dataset ('mnist64',)
[2023-12-07 16:30:30.464840] 🔈 |DEBUG| execute evaluation:predict_image-0 exit func...
[2023-12-07 16:30:30.465232] 💡 |INFO| finish step:evaluation:predict_image, index:0/1, status:success, error:None
[2023-12-07 16:30:30.465829] 💡 |INFO| finish to execute step[1]:Step: handler-evaluation:.predict_image
[2023-12-07 16:30:30.466943] 💡 |INFO| start to execute step: Step: handler-evaluation:.evaluate_results
[2023-12-07 16:30:30.467755] 💡 |INFO| start to execute task: context(step:evaluation:evaluate_results, index:0/1) step(Step: handler-evaluation:.evaluate_results, {'name': 'evaluation:evaluate_results', 'show_name': 'evaluate', 'module_name': 'evaluation', 'cls_name': '', 'func_name': 'evaluate_results', 'resources': [RuntimeResource(type='memory', request=500000000.0, limit=2000000000.0)], 'task_num': 1, 'needs': ['evaluation:predict_image'], 'extra_args': [], 'extra_kwargs': {'predict_auto_log': True}, 'expose': 0, 'virtual': None, 'require_dataset': False})
[2023-12-07 16:30:30.472041] 💡 |INFO| start to run _starwhale_internal_run_evaluate function@evaluation:evaluate_results-0 ...
[2023-12-07 16:30:30.485783] 🔈 |DEBUG| execute evaluation:evaluate_results-0 exit func...
[2023-12-07 16:30:30.486566] 💡 |INFO| finish step:evaluation:evaluate_results, index:0/1, status:success, error:None
[2023-12-07 16:30:30.487301] 💡 |INFO| finish to execute step[1]:Step: handler-evaluation:.evaluate_results
[2023-12-07 16:30:30.489883] 💯 finish run, success!
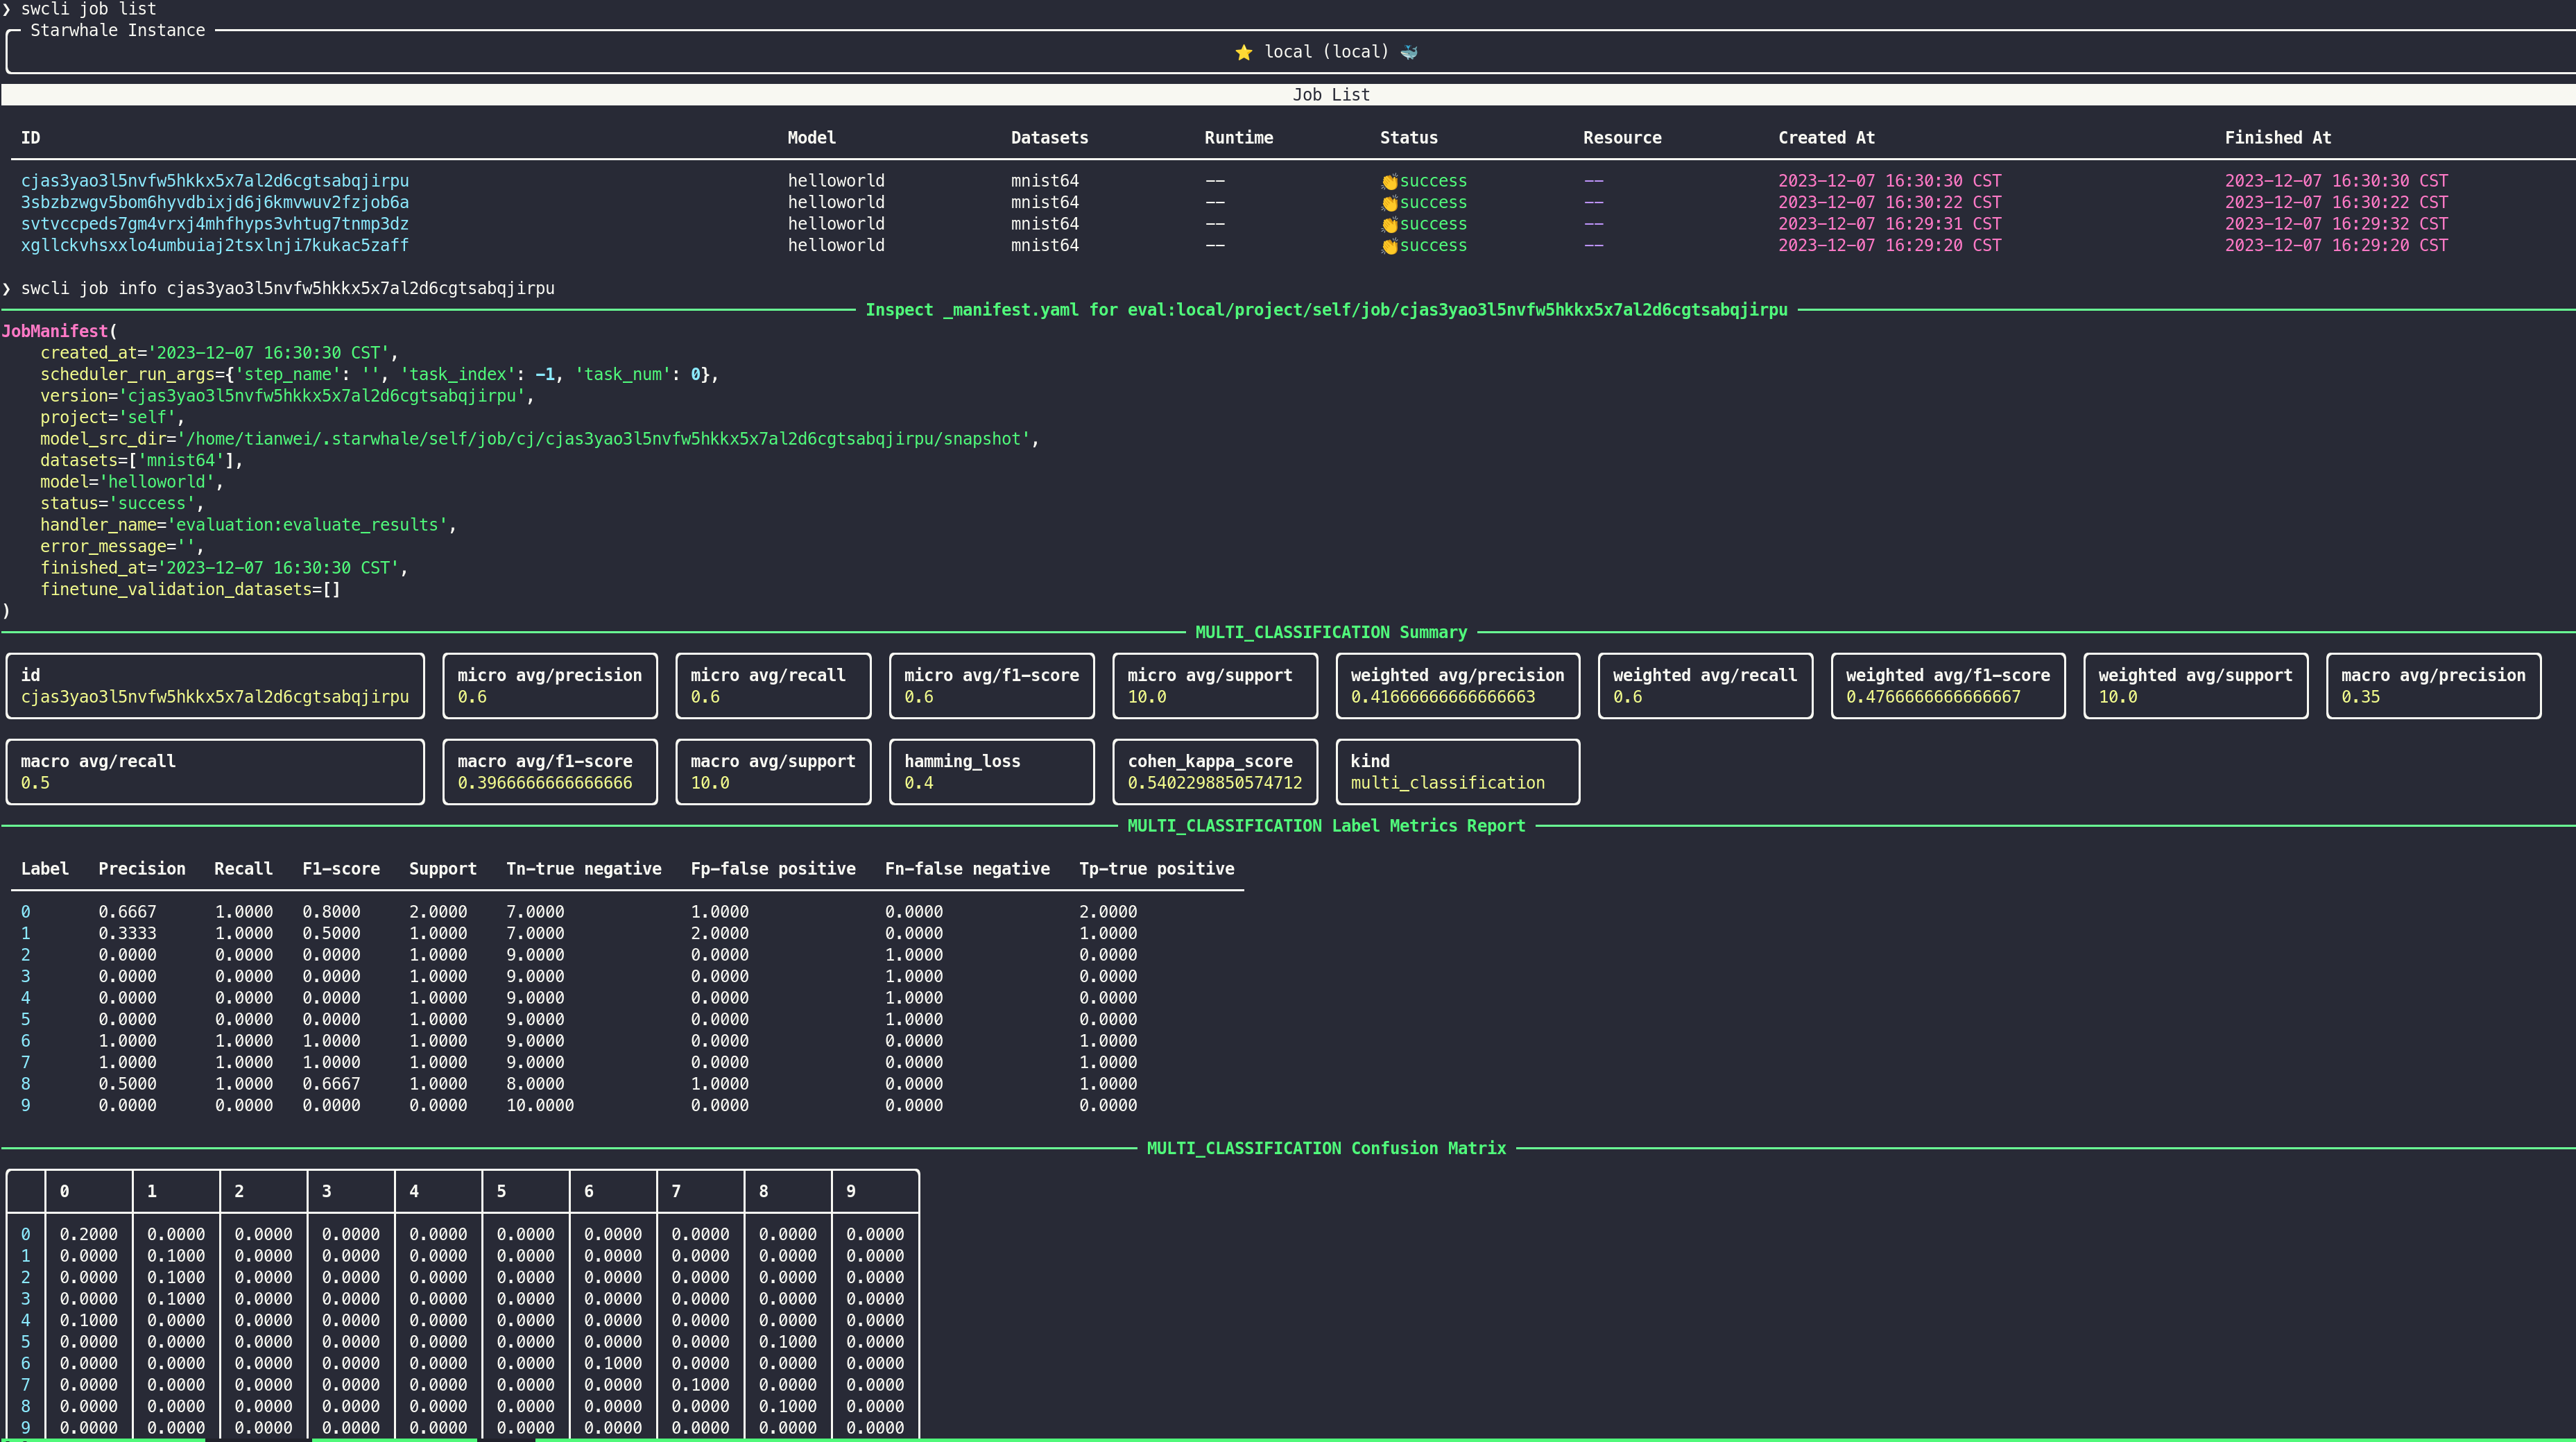
通过 swcli job info 命令来查看模型评测的相关指标:
启动 Starwhale Server
swcli server start
该命令可以一键在本地启动一个全功能的 Starwhale Server,需要机器提前安装 Docker 和 Docker-Compose。
命令输出如下:
❯ swcli server start
🛸 render compose yaml file: /home/tianwei/.starwhale/.server/docker-compose.yaml
🏓 start Starwhale Server by docker compose
 Container starwhale_local-db-1  Running
 Container starwhale_local-server-1  Running
 Container starwhale_local-db-1  Waiting
 Container starwhale_local-db-1  Healthy
Starwhale Server is running in the background.
         🍎 stop: swcli server stop
         🍌 check status: swcli server status
         🍉 more compose command: docker compose -f /home/tianwei/.starwhale/.server/docker-compose.yaml sub-command
         🥕 visit web: http://127.0.0.1:8082
拷贝数据集、模型和运行时到 Starwhale Server 上
登录 Starwhale Server
swcli instance login --username starwhale --alias local-server --password abcd1234 http://127.0.0.1:8082
本地启动的 Starwhale Server 服务用户名为 starwhale,密码为 abcd1234。
执行拷贝
swcli model cp helloworld cloud://local-server/project/1
swcli runtime cp helloworld cloud://local-server/project/1
swcli dataset cp mnist64 cloud://local-server/project/1
命令输出如下:
❯ swcli model cp helloworld cloud://local-server/project/1
🚧 start to copy local/project/self/model/helloworld/version/somjliyhbtqhcldnvnlapwpqsrignyem6ik564vb -> http://127.0.0.1:8082/project/1/model/helloworld/version/somjliyhbtqhcldnvnlapwpqsrignyem6ik564vb
scanning somjliyhbtqhcldnvnlapwpqsrignyem6ik564vb.swmp...
scan done
uploading metadata...
metadata uploaded
  ⬆ uploading somjliyhbtqhcldnvnlapwpqsrignyem6ik564vb.swmp... ━━━━━━━━━━━━━━━━━━━━━━━━━━━━━━━━━━━━━━━━ 100% 0:00:00 273.8 kB 775.2 kB/s
  ⬆ uploading the built-in runtime packaged.swrt               ━━━━━━━━━━━━━━━━━━━━━━━━━━━━━━━━━━━━━━━━ 100% 0:00:00 20.5 kB  5.5 MB/s
🍵 console url of the remote bundle: http://127.0.0.1:8082/projects/1/models/helloworld/versions/somjliyhbtqhcldnvnlapwpqsrignyem6ik564vb/overview
🍵 no tags to copy
👏 copy done.
❯ swcli runtime cp helloworld cloud://local-server/project/1
🚧 start to copy local/project/self/runtime/helloworld/version/tck2tqgpddomop4byfjbwmqk6aacg4wamidtm7eu -> http://127.0.0.1:8082/project/1/runtime/helloworld/version/tck2tqgpddomop4byfjbwmqk6aacg4wamidtm7eu
  🎳 upload tck2tqgpddomop4byfjbwmqk6aacg4wamidtm7eu.swrt ━━━━━━━━━━━━━━━━━━━━━━━━━━━━━━━━━━━━━━━━ 100% 0:00:00 20.5 kB 16.6 MB/s
🍵 console url of the remote bundle: http://127.0.0.1:8082/projects/1/runtimes/helloworld/versions/tck2tqgpddomop4byfjbwmqk6aacg4wamidtm7eu/overview
🍵 no tags to copy
👏 copy done.
❯ swcli dataset cp mnist64 cloud://local-server/project/1
🚧 start to copy local/project/self/dataset/mnist64/version/rtxx5mdwlzqmomuoe235fx4vokkempa332ivmzcr -> http://127.0.0.1:8082/project/1/dataset/mnist64/version/rtxx5mdwlzqmomuoe235fx4vokkempa332ivmzcr
🐦 copy dataset rows
⠹ ━━━━━━━━━━━━━━━━━━━━━━━━━━━━━━━━━━━━━━━━ 500 0:00:01
🦘 update dataset info
🐯 make version for dest instance
🍵 console url of the remote bundle: http://127.0.0.1:8082/projects/1/datasets/mnist64/versions/rtxx5mdwlzqmomuoe235fx4vokkempa332ivmzcr/overview
🍵 no tags to copy
👏 copy done
然后可以通过浏览器访问 http://127.0.0.1:8082,查看上传的模型、数据集和运行时。

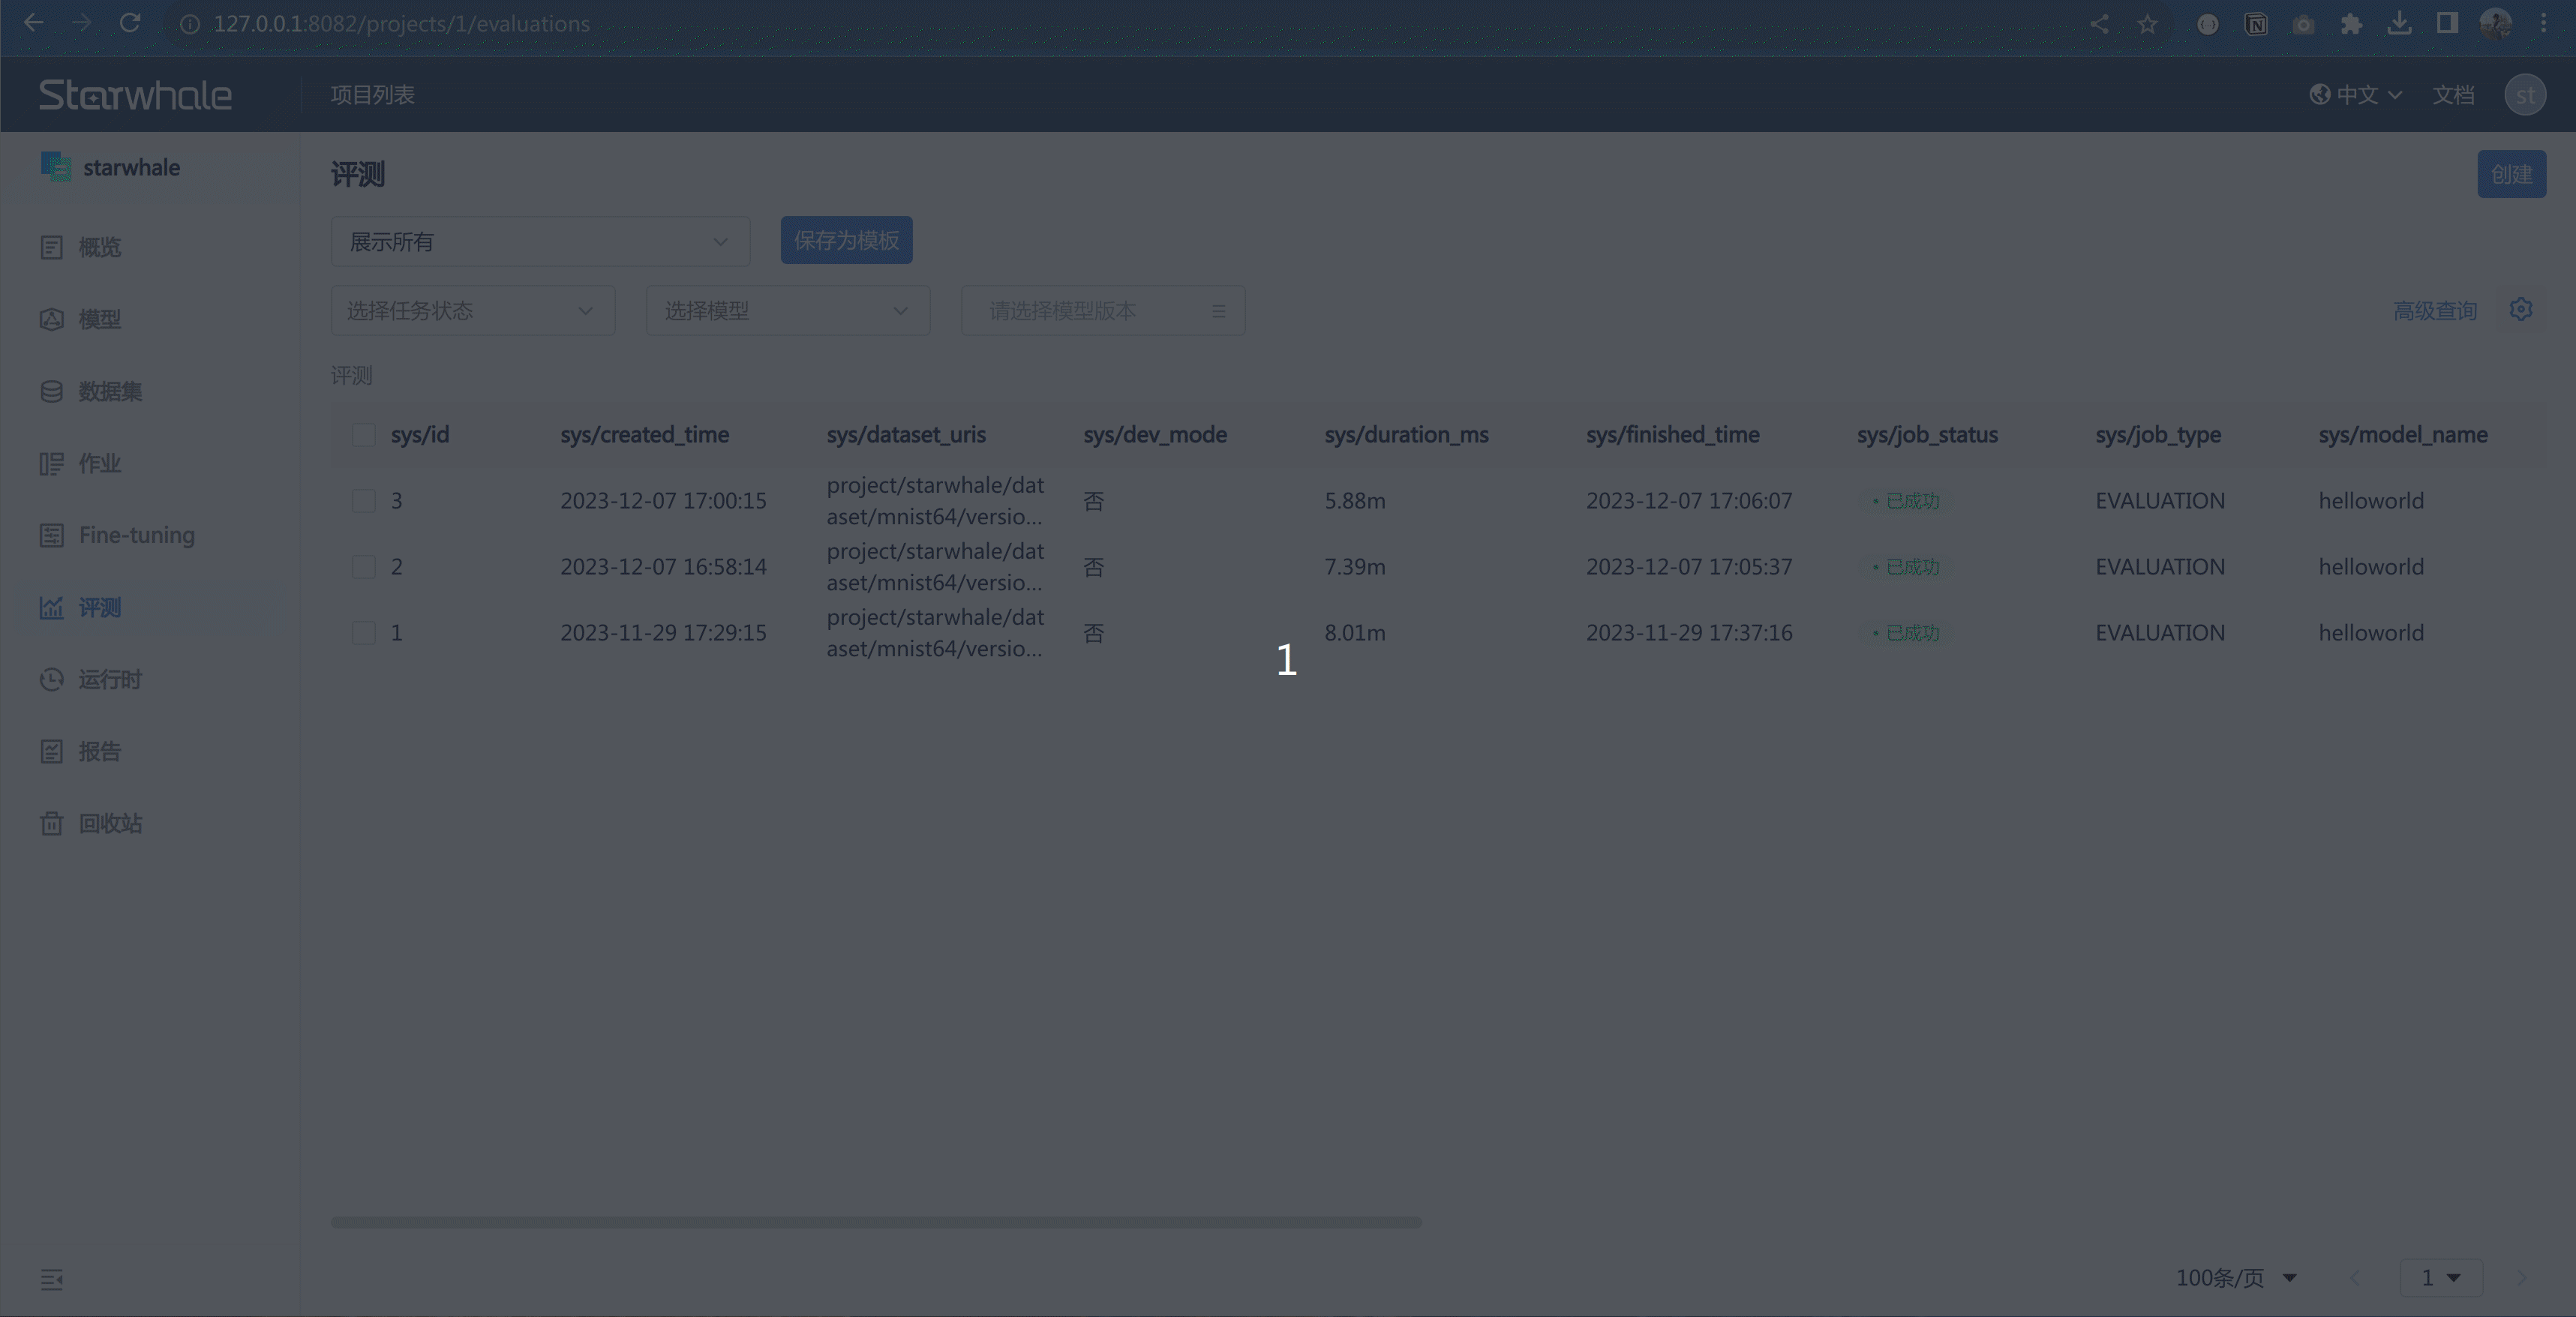
Server 实例上进行模型评测
在评测页面可以选择模型、运行时和数据集,进行评测。
评测结果对比
Starwhale 提供功能丰富的评测结果对比和可视化功能,可以在评测页面选择相关的评测结果进行对比分析。
恭喜您完成了Starwhale Helloworld例子的所有阶段。