Starwhale's Helloworld Example - Evaluating the KNN Algorithm on Handwritten Digit Recognition Tasks
This tutorial will start with the installation of the Starwhale Client, and then introduce the process of writing evaluation code, creating datasets, debugging on Standalone instances, and finally running evaluations on Server instances.
Basic Information
- Code: https://github.com/star-whale/starwhale/tree/main/example/helloworld
- Starwhale Cloud Demo: https://cloud.starwhale.cn/projects/15/overview
- Notebook: Github, Coblab
- Reproduction time: 10-15 mins
- Environment:
- Laptop or dev manchine, GPU is optional
- Linux or macOS
- Python3.7 ~ 3.11
Installing Starwhale Client
python3 -m pip install starwhale
Building Starwhale Runtime
Starwhale runtime provides a series of Python environment definitions and reproduction tools that can meet the environmental requirements for machine learning development and debugging. A typical way to create a Starwhale runtime is to start by writing a runtime.yaml file:
name: helloworld  # runtime name
mode: venv        # use virtualenv
dependencies:     # python deps
  - requirements.txt
In the hellowrold example, we first define the name of the runtime and set the Python isolated environment to venv. Then, we add some Python dependencies, completing the definition of the runtime.yaml file. Although the definition is simple, Starwhale will help you with many environment-related tasks in the background, such as:
- Shielding details like Docker Image and Dockerfile
- Automatically adding CUDA and CuDNN dependencies
- Providing a carefully optimized Docker Base Image for machine learning development needs
- Automatically locking all dependency versions to ensure consistent reproduction environments
- Automatically locking Starwhale Client version
- Automatically locking Python version
- Offering two options for running isolated environments: venv and conda
- Providing version control for the runtime environment and the ability to freely share it with other Starwhale instances
Next, we usually execute the build command to generate a Starwhale runtime with a version number:
swcli runtime build --yaml runtime.yaml
Command output:
❯ swcli runtime build --yaml runtime.yaml
🚧 start to build runtime bundle...
👷 uri local/project/self/runtime/helloworld/version/hlp6mixccpi5sdmuoxdstfn5nf5xebu2lac2gz4x
🐦 runtime will ignore pypi editable package
👽 try to lock environment dependencies to /home/tianwei/code/starwhale/example/helloworld ...
🦋 lock dependencies at mode venv
🍼 install runtime.yaml dependencies @ /home/tianwei/code/starwhale/example/helloworld/.starwhale/venv for lock...
🐱 use /home/tianwei/code/starwhale/example/helloworld/.starwhale/venv/bin/python3 to freeze requirements...
🐭 dump lock file: /home/tianwei/code/starwhale/example/helloworld/.starwhale/lock/requirements-sw-lock.txt
📁 workdir: /home/tianwei/.starwhale/self/workdir/runtime/helloworld/hl/hlp6mixccpi5sdmuoxdstfn5nf5xebu2lac2gz4x
🐝 dump environment info...
🥯 dump dependencies info...
🌈 runtime uses builtin docker image: docker-registry.starwhale.cn/star-whale/base:0.3.4  🌈
🦋 .swrt bundle:/home/tianwei/.starwhale/self/runtime/helloworld/hl/hlp6mixccpi5sdmuoxdstfn5nf5xebu2lac2gz4x.swrt
  10 out of 10 steps finished ━━━━━━━━━━━━━━━━━━━━━━━━━━━━━━━━━━━━━━━━ 100% 0:00:00 0:00:00
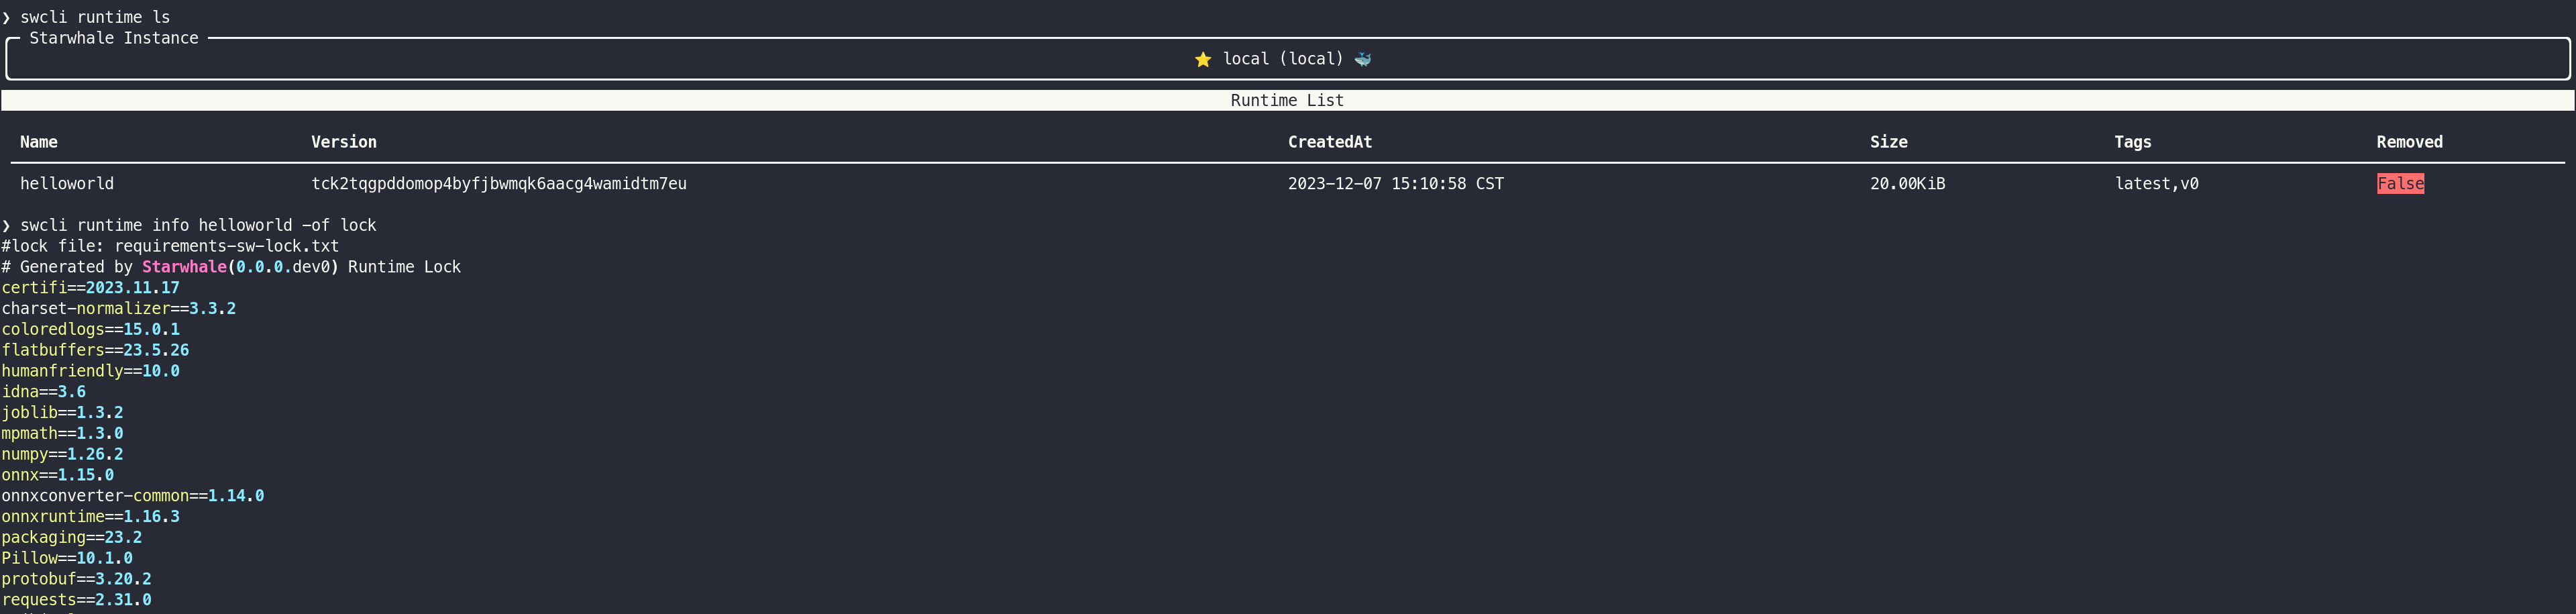
After that, you can use some runtime management commands to view version and other information:
swcli runtime list
swcli runtime info helloworld
We can use the built Starwhale runtime as the execution environment to perform tasks such as model package construction, dataset construction, and model evaluation.
Building MNIST dataset
MNIST dataset in the scikit-learn library is a simplified version of MNIST, containing 500 8x8 pixel images.
Starwhale provides a series of Python SDKs for dataset construction and loading, allowing you to build unstructured datasets with minimal code. Let's take a look at the core code for constructing the MNIST dataset. For the complete code, please refer to dataset.py.
import io
from pathlib import Path

import numpy as np
from PIL import Image as PILImage
from tqdm import tqdm

from starwhale import Image, dataset, MIMEType, init_logger

init_logger(3)

# download the raw data
data_dir = Path(__file__).parent / "data"
url = "https://starwhale-examples.oss-cn-beijing.aliyuncs.com/dataset/mnist/digits.csv"
download(url, data_dir / fname)

# build Starwhale Dataset
with dataset("mnist64") as ds:   # <---- define starwhale dataset object
    with (data_dir / fname).open("r") as f:
        data = np.loadtxt(f, delimiter=",")
        targets = data[:, -1].astype(int, copy=False)
        images = data[:, :-1]

        for i in tqdm(range(0, min(500, len(images)))):
            img_2d_array = (np.reshape(images[i], (8, 8)) * 255).astype(np.uint8)
            img_bytes = io.BytesIO()
            PILImage.fromarray(img_2d_array, "L").save(img_bytes, format="PNG")
            ds[i] = {           # <----- append data into dataset
                "img": Image(
                    img_bytes.getvalue(),
                    display_name=f"{i}",
                    shape=(8, 8, 1),
                    mime_type=MIMEType.PNG,
                ),
                "label": targets[i],
            }
    ds.commit()                # <---- commit dataset

print(f"{ds.uri} dataset build done")
There are three steps to build a Starwhale Dataset:
- Declare the Starwhale Dataset object:
with dataset("mnist64") as ds: - Iterate through the raw data and add it to the Starwhale Dataset object, similar to adding elements to a dict or list:
ds[i]={"img": Image(), ...} - Commit the changes to create a dataset version:
ds.commit()
After executing the dataset construction script, you can use the swcli command to view the dataset details:
swcli -vvv runtime activate helloworld
python3 dataset.py

Furthermore, Starwhale Dataset supports full Python SDK operations, allowing you to experience dataset functionalities in interactive environments like Jupyter Notebook or IPython. You can refer to the dataset SDK example for more information.
Model Evaluation Code
Starwhale provides a series of Python SDKs for model evaluation, allowing you to implement distributed, multi-dataset model evaluation with minimal code changes. Starwhale generally recommends dividing model evaluation into two stages: predict and evaluate. Each stage can specify resource usage and set task dependencies through the needs parameter. For the complete code, please refer to evaluation.py.
predict phase
from starwhale import Image, evaluation

@evaluation.predict(
    resources={"memory": {"request": "500M", "limit": "2G"}},
    replicas=3,
    log_mode="plain",
)
def predict_image(data):
    img: Image = data["img"]
    model = _load_model()
    input_name = model.get_inputs()[0].name
    label_name = model.get_outputs()[0].name
    input_array = [img.to_numpy().astype(np.float32).reshape(64)]
    pred = model.run([label_name], {input_name: input_array})[0]
    return pred.item()
The predict stage is equivalent to the map stage in the MapReduce architecture. Each predict task will load the model, process the input data from the dataset, and complete the inference. The returned inference results will be automatically recorded in the relevant datastore table by Starwhale and can be used in the evaluate stage.
evaluate phase
from starwhale import Image, evaluation, multi_classification
@evaluation.evaluate(
    needs=[predict_image],
    resources={"memory": {"request": "500M", "limit": "2G"}},
)
@multi_classification(
    confusion_matrix_normalize="all",
    show_hamming_loss=True,
    show_cohen_kappa_score=True,
    show_roc_auc=False,
    all_labels=[i for i in range(0, 10)],
)
def evaluate_results(predict_result_iter):
    result, label = [], []
    for _data in predict_result_iter:
        label.append(_data["input"]["label"])
        result.append(_data["output"])
    return label, result
The evaluate stage is equivalent to the reduce stage in the MapReduce architecture, where the inference results generated in the previous predict stage are summarized, and some model evaluation metrics are calculated. The results are then written to datastore tables for further comparison and analysis. The Helloworld example is a classic multi-classification problem, and we can directly use the @starwhale.multi_classification decorator for metric analysis, generating metrics such as Recall, Accuracy, and Precision.
Building Starwhale Model
The Starwhale model building process is very simple. By calling model building through swcli or the Python SDK, related files are packaged to generate a versioned, shareable, runnable Starwhale model package.
swcli -vvv model build . --name helloworld -m evaluation --runtime helloworld
The above command will perform the following operations:
- Package the files and subdirectories under the
.directory, mainly weight files, Python code and configuration files. During packaging, files or directories to be ignored are determined according to the.swignorefile. - The Starwhale model package automatically recognizes the
README.mdfile in the root directory and renders it in the Starwhale Server web interface. - Analyze the function definitions in the
evaluationmodule to generate handlers for running the Starwhale model. - Use the helloworld runtime to run the packaging process. Since Starwhale model building loads code files, using the Starwhale runtime is the recommended practice.
- Automatically inject the helloworld runtime into the Starwhale model as a built-in runtime for co-distribution with the model package.
- Generate a model package with a unique version that can be distributed across different instances.
❯ swcli model build . --name helloworld -m evaluation --runtime helloworld
🦉 start to run in the new process with runtime environment: local/project/self/runtime/helloworld/version/tck2tqgpddomop4byfjbwmqk6aacg4wamidtm7eu
🐌 start to restore runtime: local/project/self/runtime/helloworld/version/tck2tqgpddomop4byfjbwmqk6aacg4wamidtm7eu
🧮 setup python(3.9) env with venv...
👏 create venv@/home/tianwei/.starwhale/self/workdir/runtime/helloworld/tc/tck2tqgpddomop4byfjbwmqk6aacg4wamidtm7eu/export/venv, python:3.9.13 (main, Oct 13 2022, 21:15:33)
🍡 installing dependencies for pip_req_file:.starwhale/lock/requirements-sw-lock.txt in the venv environment
  6 out of 6 steps finished ━━━━━━━━━━━━━━━━━━━━━━━━━━━━━━━━━━━━━━━━ 100% 0:00:00 0:00:30
🐓 run process in the python isolated environment(prefix: /home/tianwei/.starwhale/self/workdir/runtime/helloworld/tc/tck2tqgpddomop4byfjbwmqk6aacg4wamidtm7eu/export/venv)
🚧 start to build model bundle...
👷 uri local/project/self/model/helloworld/version/somjliyhbtqhcldnvnlapwpqsrignyem6ik564vb
📁 workdir: /home/tianwei/.starwhale/.tmp/tmpcihsv20w
🦚 copy source code files: . -> /home/tianwei/.starwhale/.tmp/tmpcihsv20w/src
📁 source code files size: 238.35KiB
💿 package runtime(local/project/self/runtime/helloworld/version/tck2tqgpddomop4byfjbwmqk6aacg4wamidtm7eu) to /home/tianwei/.starwhale/.tmp/tmpcihsv20w/src/.starwhale/runtime/packaged.swrt
🚀 generate jobs yaml from modules: ('evaluation',) , package rootdir: .
  10 out of 10 steps finished ━━━━━━━━━━━━━━━━━━━━━━━━━━━━━━━━━━━━━━━━ 100% 0:00:00 0:00:00
💯 finish gen resource @ /home/tianwei/.starwhale/self/model/helloworld/so/somjliyhbtqhcldnvnlapwpqsrignyem6ik564vb.swmp

Running model evaluation in Starwhale Standalone
We have completed the construction of the model package, runtime, and dataset above. Next, we can conduct model evaluation to test some model evaluation effects. The Starwhale Standalone instance is specially designed for development and debugging environments. Model evaluation can also be performed on a small amount of data on Standalone to verify there are no issues with the code, before running larger-scale evaluation datasets on the Starwhale Server or Starwhale Cloud instance.
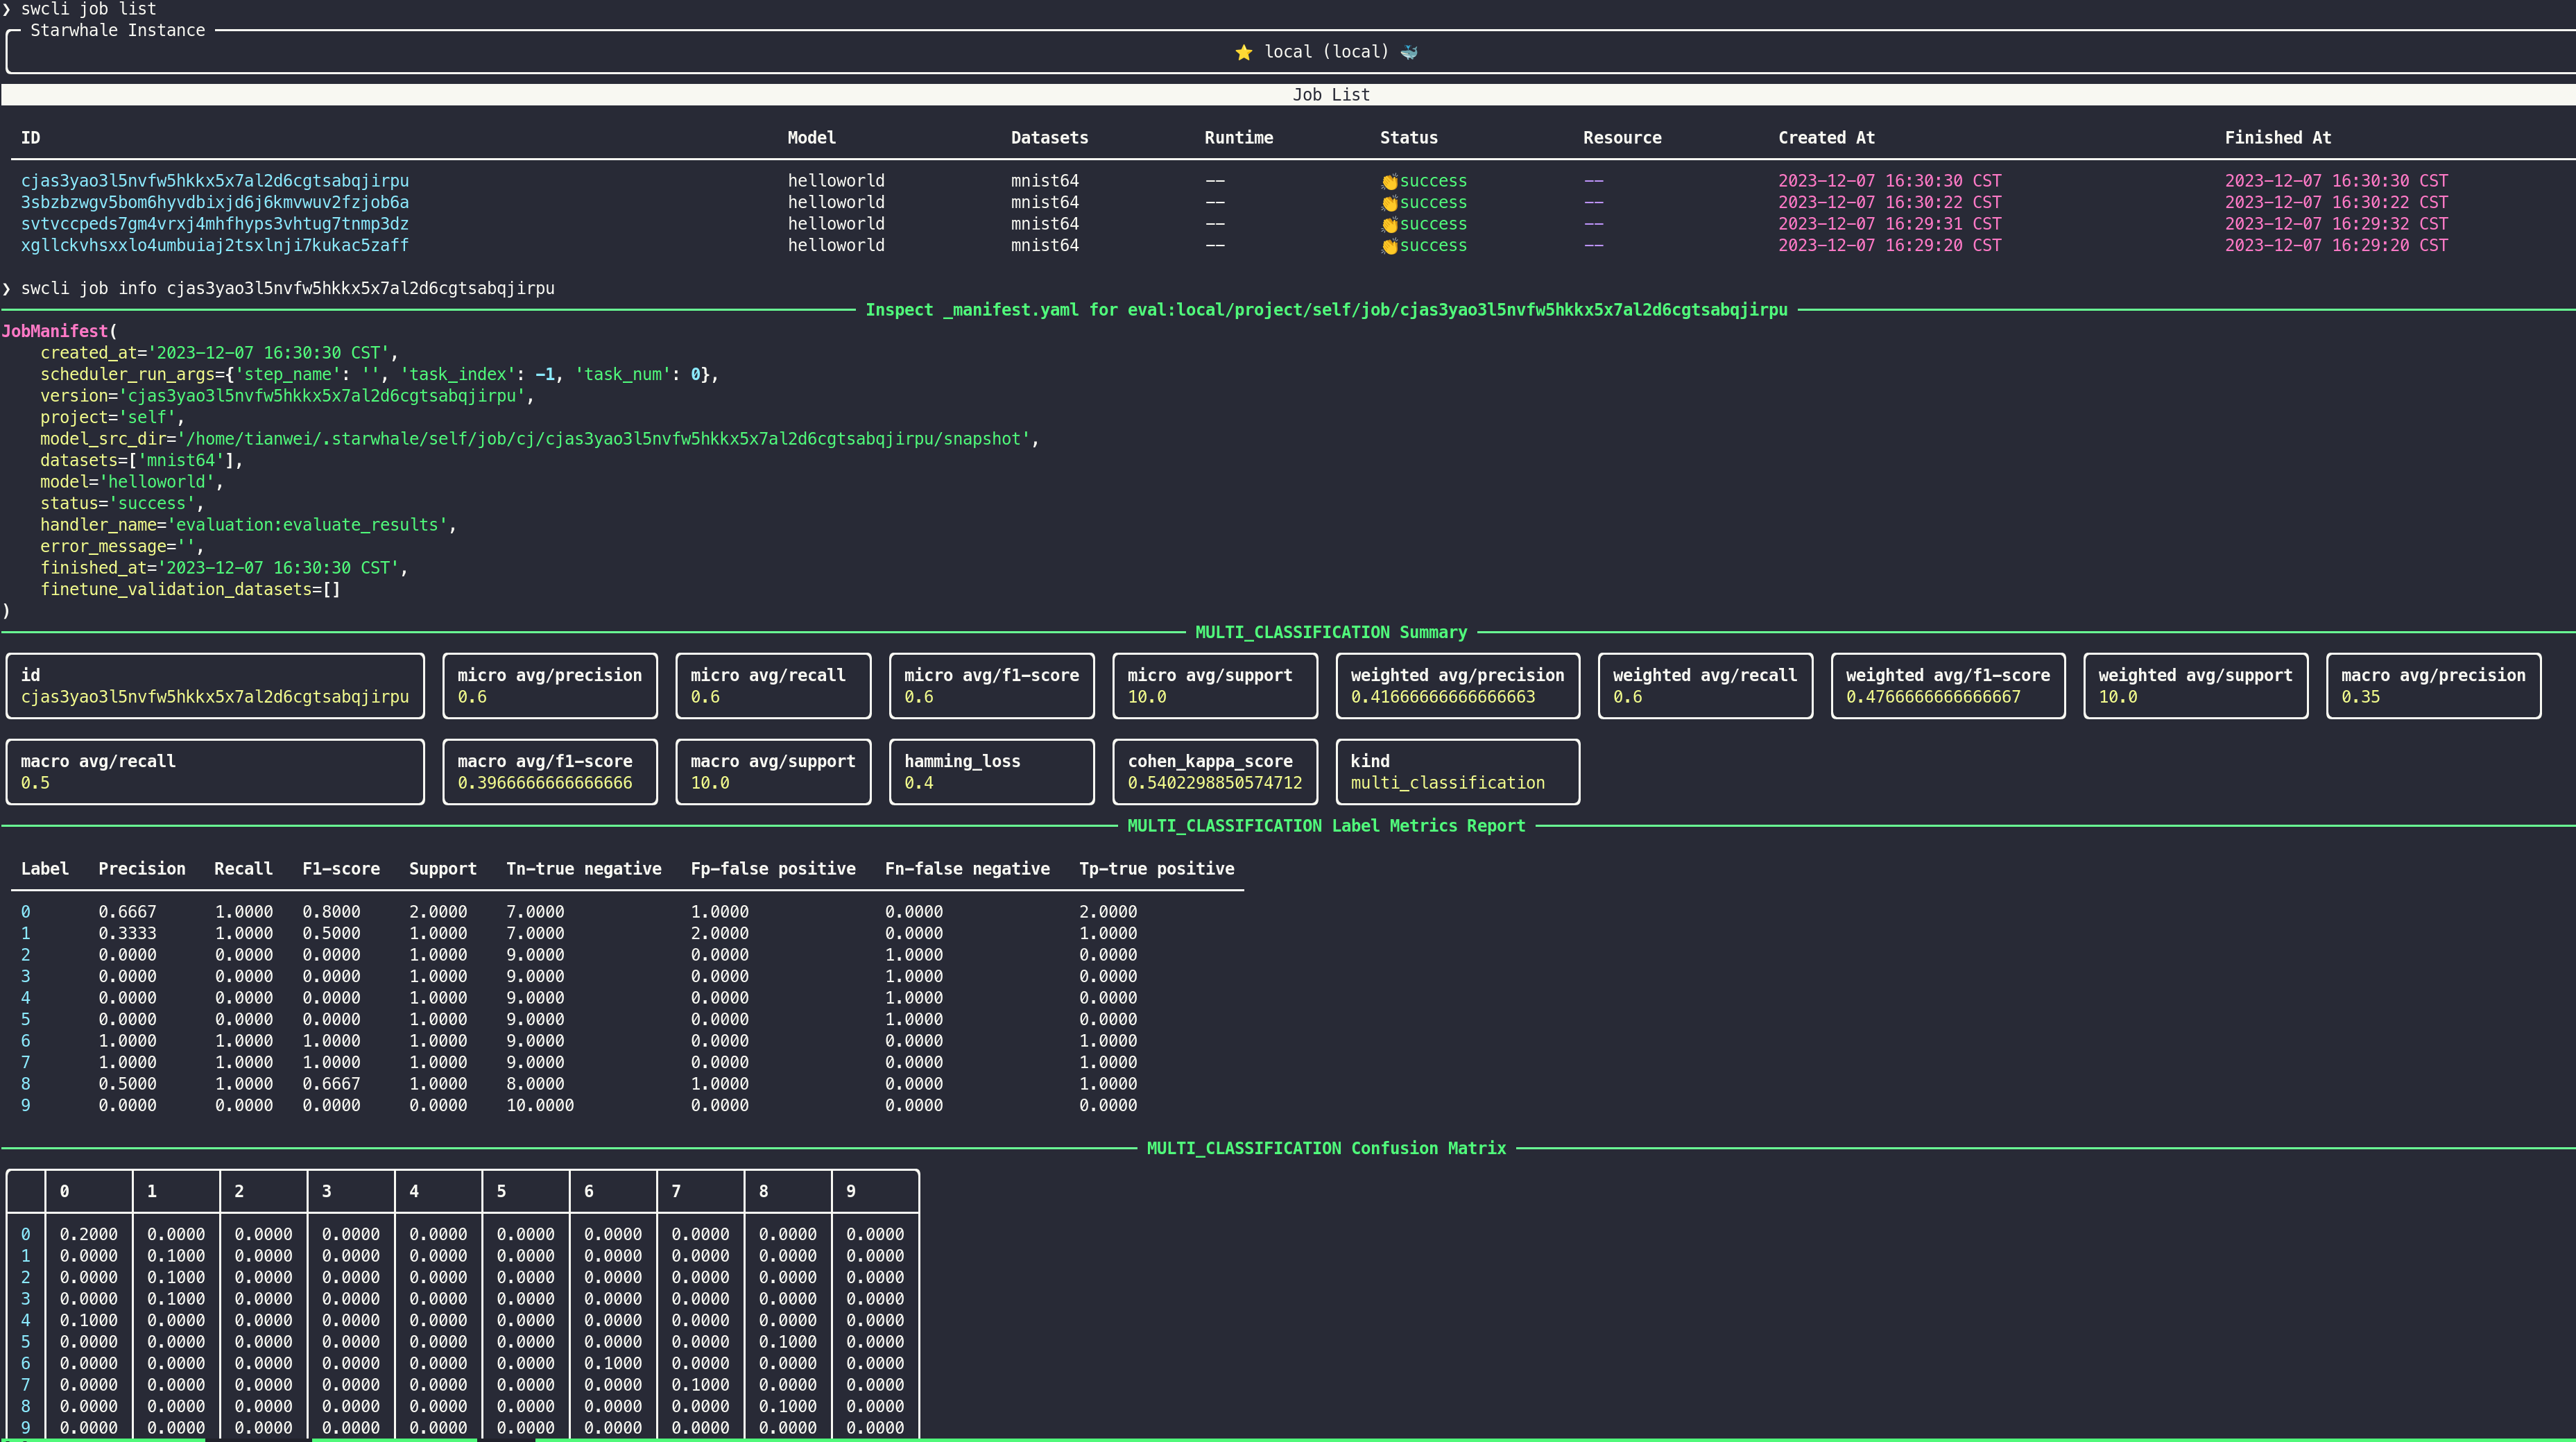
swcli -vvv model run --uri helloworld --dataset mnist64 --runtime helloworld --dataset-head 10
We only use the first 10 data entries in the dataset for evaluation. The command output is as follows:
❯ swcli -vvv model run --uri helloworld --dataset mnist64 --runtime helloworld --dataset-head 10
[2023-12-07 16:30:28.334074] 👾 verbosity: 3, log level: DEBUG
[2023-12-07 16:30:28.346034] 🦉 start to run in the new process with runtime environment: local/project/self/runtime/helloworld/version/tck2tqgpddomop4byfjbwmqk6aacg4wamidtm7eu
[2023-12-07 16:30:28.346984] 🐓 run process in the python isolated environment(prefix: /home/tianwei/.starwhale/self/workdir/runtime/helloworld/tc/tck2tqgpddomop4byfjbwmqk6aacg4wamidtm7eu/export/venv)
[2023-12-07 16:30:28.363485] 🔈 |DEBUG| cmd: ['bash', '-c', 'source /home/tianwei/.starwhale/self/workdir/runtime/helloworld/tc/tck2tqgpddomop4byfjbwmqk6aacg4wamidtm7eu/export/venv/bin/activate && /home/tianwei/.starwhale/self/workdir/runtime/helloworld/tc/tck2tqgpddomop4byfjbwmqk6aacg4wamidtm7eu/export/venv/bin/swcli -vvv model run --uri helloworld --dataset mnist64 --dataset-head 10']
[2023-12-07 16:30:29.996979] 👾 verbosity: 3, log level: DEBUG
[2023-12-07 16:30:30.005397] ✈ change current dir to /home/tianwei/.starwhale/self/job/cj/cjas3yao3l5nvfw5hkkx5x7al2d6cgtsabqjirpu/snapshot
[2023-12-07 16:30:30.005850] ⏳ start to run model, handler:0 ...
[2023-12-07 16:30:30.010668] 🏦 runnable handlers:
[2023-12-07 16:30:30.011033]     *  [0]: evaluation:evaluate_results
[2023-12-07 16:30:30.011466]        [1]: evaluation:predict_image
[2023-12-07 16:30:30.012296] 💡 |INFO| start to execute step: Step: handler-evaluation:.predict_image
[2023-12-07 16:30:30.014036] 💡 |INFO| start to execute task: context(step:evaluation:predict_image, index:0/1) step(Step: handler-evaluation:.predict_image, {'name': 'evaluation:predict_image', 'show_name': 'predict', 'module_name': 'evaluation', 'cls_name': '', 'func_name': 'predict_image', 'resources': [RuntimeResource(type='memory', request=500000000.0, limit=2000000000.0)], 'task_num': 1, 'needs': [], 'extra_args': [], 'extra_kwargs': {'dataset_uris': None, 'ignore_error': False, 'predict_auto_log': True, 'predict_batch_size': 1, 'predict_log_dataset_features': None, 'predict_log_mode': 'plain'}, 'expose': 0, 'virtual': None, 'require_dataset': True})
[2023-12-07 16:30:30.036313] 💡 |INFO| start to run _starwhale_internal_run_predict function@evaluation:predict_image-0 ...
[2023-12-07 16:30:30.216042] 💡 |INFO| thread-140277817129088 handle scan-range: (0, 50)
[2023-12-07 16:30:30.237276] 🔈 |DEBUG| new store backendObjectStore backend:StorageBackend for local_fs created for key: local.
[2023-12-07 16:30:30.254205] 💡 |INFO| thread-140277817129088 handle scan-range: (50, 100)
[2023-12-07 16:30:30.297356] 🔈 |DEBUG|  use 0.058s, session-id:cjas3yao3l5nvfw5hkkx5x7al2d6cgtsabqjirpu @evaluation:predict_image-0
[2023-12-07 16:30:30.301059] 💡 |INFO| thread-140277817129088 handle scan-range: (100, 150)
[2023-12-07 16:30:30.301784] 🔈 |DEBUG|  use 0.004s, session-id:cjas3yao3l5nvfw5hkkx5x7al2d6cgtsabqjirpu @evaluation:predict_image-0
[2023-12-07 16:30:30.304711] 🔈 |DEBUG|  use 0.002s, session-id:cjas3yao3l5nvfw5hkkx5x7al2d6cgtsabqjirpu @evaluation:predict_image-0
[2023-12-07 16:30:30.307783] 🔈 |DEBUG|  use 0.002s, session-id:cjas3yao3l5nvfw5hkkx5x7al2d6cgtsabqjirpu @evaluation:predict_image-0
[2023-12-07 16:30:30.311066] 🔈 |DEBUG|  use 0.003s, session-id:cjas3yao3l5nvfw5hkkx5x7al2d6cgtsabqjirpu @evaluation:predict_image-0
[2023-12-07 16:30:30.314291] 🔈 |DEBUG|  use 0.002s, session-id:cjas3yao3l5nvfw5hkkx5x7al2d6cgtsabqjirpu @evaluation:predict_image-0
[2023-12-07 16:30:30.318806] 🔈 |DEBUG|  use 0.004s, session-id:cjas3yao3l5nvfw5hkkx5x7al2d6cgtsabqjirpu @evaluation:predict_image-0
[2023-12-07 16:30:30.323726] 🔈 |DEBUG|  use 0.004s, session-id:cjas3yao3l5nvfw5hkkx5x7al2d6cgtsabqjirpu @evaluation:predict_image-0
[2023-12-07 16:30:30.357769] 🔈 |DEBUG|  use 0.033s, session-id:cjas3yao3l5nvfw5hkkx5x7al2d6cgtsabqjirpu @evaluation:predict_image-0
[2023-12-07 16:30:30.361139] 🔈 |DEBUG|  use 0.003s, session-id:cjas3yao3l5nvfw5hkkx5x7al2d6cgtsabqjirpu @evaluation:predict_image-0
[2023-12-07 16:30:30.463597] 💡 |INFO| evaluation:predict_image-0 received 10 data items for dataset ('mnist64',)
[2023-12-07 16:30:30.464840] 🔈 |DEBUG| execute evaluation:predict_image-0 exit func...
[2023-12-07 16:30:30.465232] 💡 |INFO| finish step:evaluation:predict_image, index:0/1, status:success, error:None
[2023-12-07 16:30:30.465829] 💡 |INFO| finish to execute step[1]:Step: handler-evaluation:.predict_image
[2023-12-07 16:30:30.466943] 💡 |INFO| start to execute step: Step: handler-evaluation:.evaluate_results
[2023-12-07 16:30:30.467755] 💡 |INFO| start to execute task: context(step:evaluation:evaluate_results, index:0/1) step(Step: handler-evaluation:.evaluate_results, {'name': 'evaluation:evaluate_results', 'show_name': 'evaluate', 'module_name': 'evaluation', 'cls_name': '', 'func_name': 'evaluate_results', 'resources': [RuntimeResource(type='memory', request=500000000.0, limit=2000000000.0)], 'task_num': 1, 'needs': ['evaluation:predict_image'], 'extra_args': [], 'extra_kwargs': {'predict_auto_log': True}, 'expose': 0, 'virtual': None, 'require_dataset': False})
[2023-12-07 16:30:30.472041] 💡 |INFO| start to run _starwhale_internal_run_evaluate function@evaluation:evaluate_results-0 ...
[2023-12-07 16:30:30.485783] 🔈 |DEBUG| execute evaluation:evaluate_results-0 exit func...
[2023-12-07 16:30:30.486566] 💡 |INFO| finish step:evaluation:evaluate_results, index:0/1, status:success, error:None
[2023-12-07 16:30:30.487301] 💡 |INFO| finish to execute step[1]:Step: handler-evaluation:.evaluate_results
[2023-12-07 16:30:30.489883] 💯 finish run, success!
Use the swcli job info command to view metrics related to the model evaluation:
Starting Starwhale Server
swcli server start
This command can start a fully functional Starwhale Server locally. The machine needs to have Docker and Docker-Compose installed in advance.
The command output is as follows:
❯ swcli server start
🛸 render compose yaml file: /home/tianwei/.starwhale/.server/docker-compose.yaml
🏓 start Starwhale Server by docker compose
 Container starwhale_local-db-1  Running
 Container starwhale_local-server-1  Running
 Container starwhale_local-db-1  Waiting
 Container starwhale_local-db-1  Healthy
Starwhale Server is running in the background.
         🍎 stop: swcli server stop
         🍌 check status: swcli server status
         🍉 more compose command: docker compose -f /home/tianwei/.starwhale/.server/docker-compose.yaml sub-command
         🥕 visit web: http://127.0.0.1:8082
Copy runtime, model and dataset to Starwhale Server
Login Starwhale Server
swcli instance login --username starwhale --alias local-server --password abcd1234 http://127.0.0.1:8082
The username for the locally launched Starwhale Server service is starwhale and the password is abcd1234.
Copying
swcli model cp helloworld cloud://local-server/project/1
swcli runtime cp helloworld cloud://local-server/project/1
swcli dataset cp mnist64 cloud://local-server/project/1
The output of the commands:
❯ swcli model cp helloworld cloud://local-server/project/1
🚧 start to copy local/project/self/model/helloworld/version/somjliyhbtqhcldnvnlapwpqsrignyem6ik564vb -> http://127.0.0.1:8082/project/1/model/helloworld/version/somjliyhbtqhcldnvnlapwpqsrignyem6ik564vb
scanning somjliyhbtqhcldnvnlapwpqsrignyem6ik564vb.swmp...
scan done
uploading metadata...
metadata uploaded
  ⬆ uploading somjliyhbtqhcldnvnlapwpqsrignyem6ik564vb.swmp... ━━━━━━━━━━━━━━━━━━━━━━━━━━━━━━━━━━━━━━━━ 100% 0:00:00 273.8 kB 775.2 kB/s
  ⬆ uploading the built-in runtime packaged.swrt               ━━━━━━━━━━━━━━━━━━━━━━━━━━━━━━━━━━━━━━━━ 100% 0:00:00 20.5 kB  5.5 MB/s
🍵 console url of the remote bundle: http://127.0.0.1:8082/projects/1/models/helloworld/versions/somjliyhbtqhcldnvnlapwpqsrignyem6ik564vb/overview
🍵 no tags to copy
👏 copy done.
❯ swcli runtime cp helloworld cloud://local-server/project/1
🚧 start to copy local/project/self/runtime/helloworld/version/tck2tqgpddomop4byfjbwmqk6aacg4wamidtm7eu -> http://127.0.0.1:8082/project/1/runtime/helloworld/version/tck2tqgpddomop4byfjbwmqk6aacg4wamidtm7eu
  🎳 upload tck2tqgpddomop4byfjbwmqk6aacg4wamidtm7eu.swrt ━━━━━━━━━━━━━━━━━━━━━━━━━━━━━━━━━━━━━━━━ 100% 0:00:00 20.5 kB 16.6 MB/s
🍵 console url of the remote bundle: http://127.0.0.1:8082/projects/1/runtimes/helloworld/versions/tck2tqgpddomop4byfjbwmqk6aacg4wamidtm7eu/overview
🍵 no tags to copy
👏 copy done.
❯ swcli dataset cp mnist64 cloud://local-server/project/1
🚧 start to copy local/project/self/dataset/mnist64/version/rtxx5mdwlzqmomuoe235fx4vokkempa332ivmzcr -> http://127.0.0.1:8082/project/1/dataset/mnist64/version/rtxx5mdwlzqmomuoe235fx4vokkempa332ivmzcr
🐦 copy dataset rows
⠹ ━━━━━━━━━━━━━━━━━━━━━━━━━━━━━━━━━━━━━━━━ 500 0:00:01
🦘 update dataset info
🐯 make version for dest instance
🍵 console url of the remote bundle: http://127.0.0.1:8082/projects/1/datasets/mnist64/versions/rtxx5mdwlzqmomuoe235fx4vokkempa332ivmzcr/overview
🍵 no tags to copy
👏 copy done
Then you can access http://127.0.0.1:8082 through a browser to view the uploaded models, datasets, and runtimes.

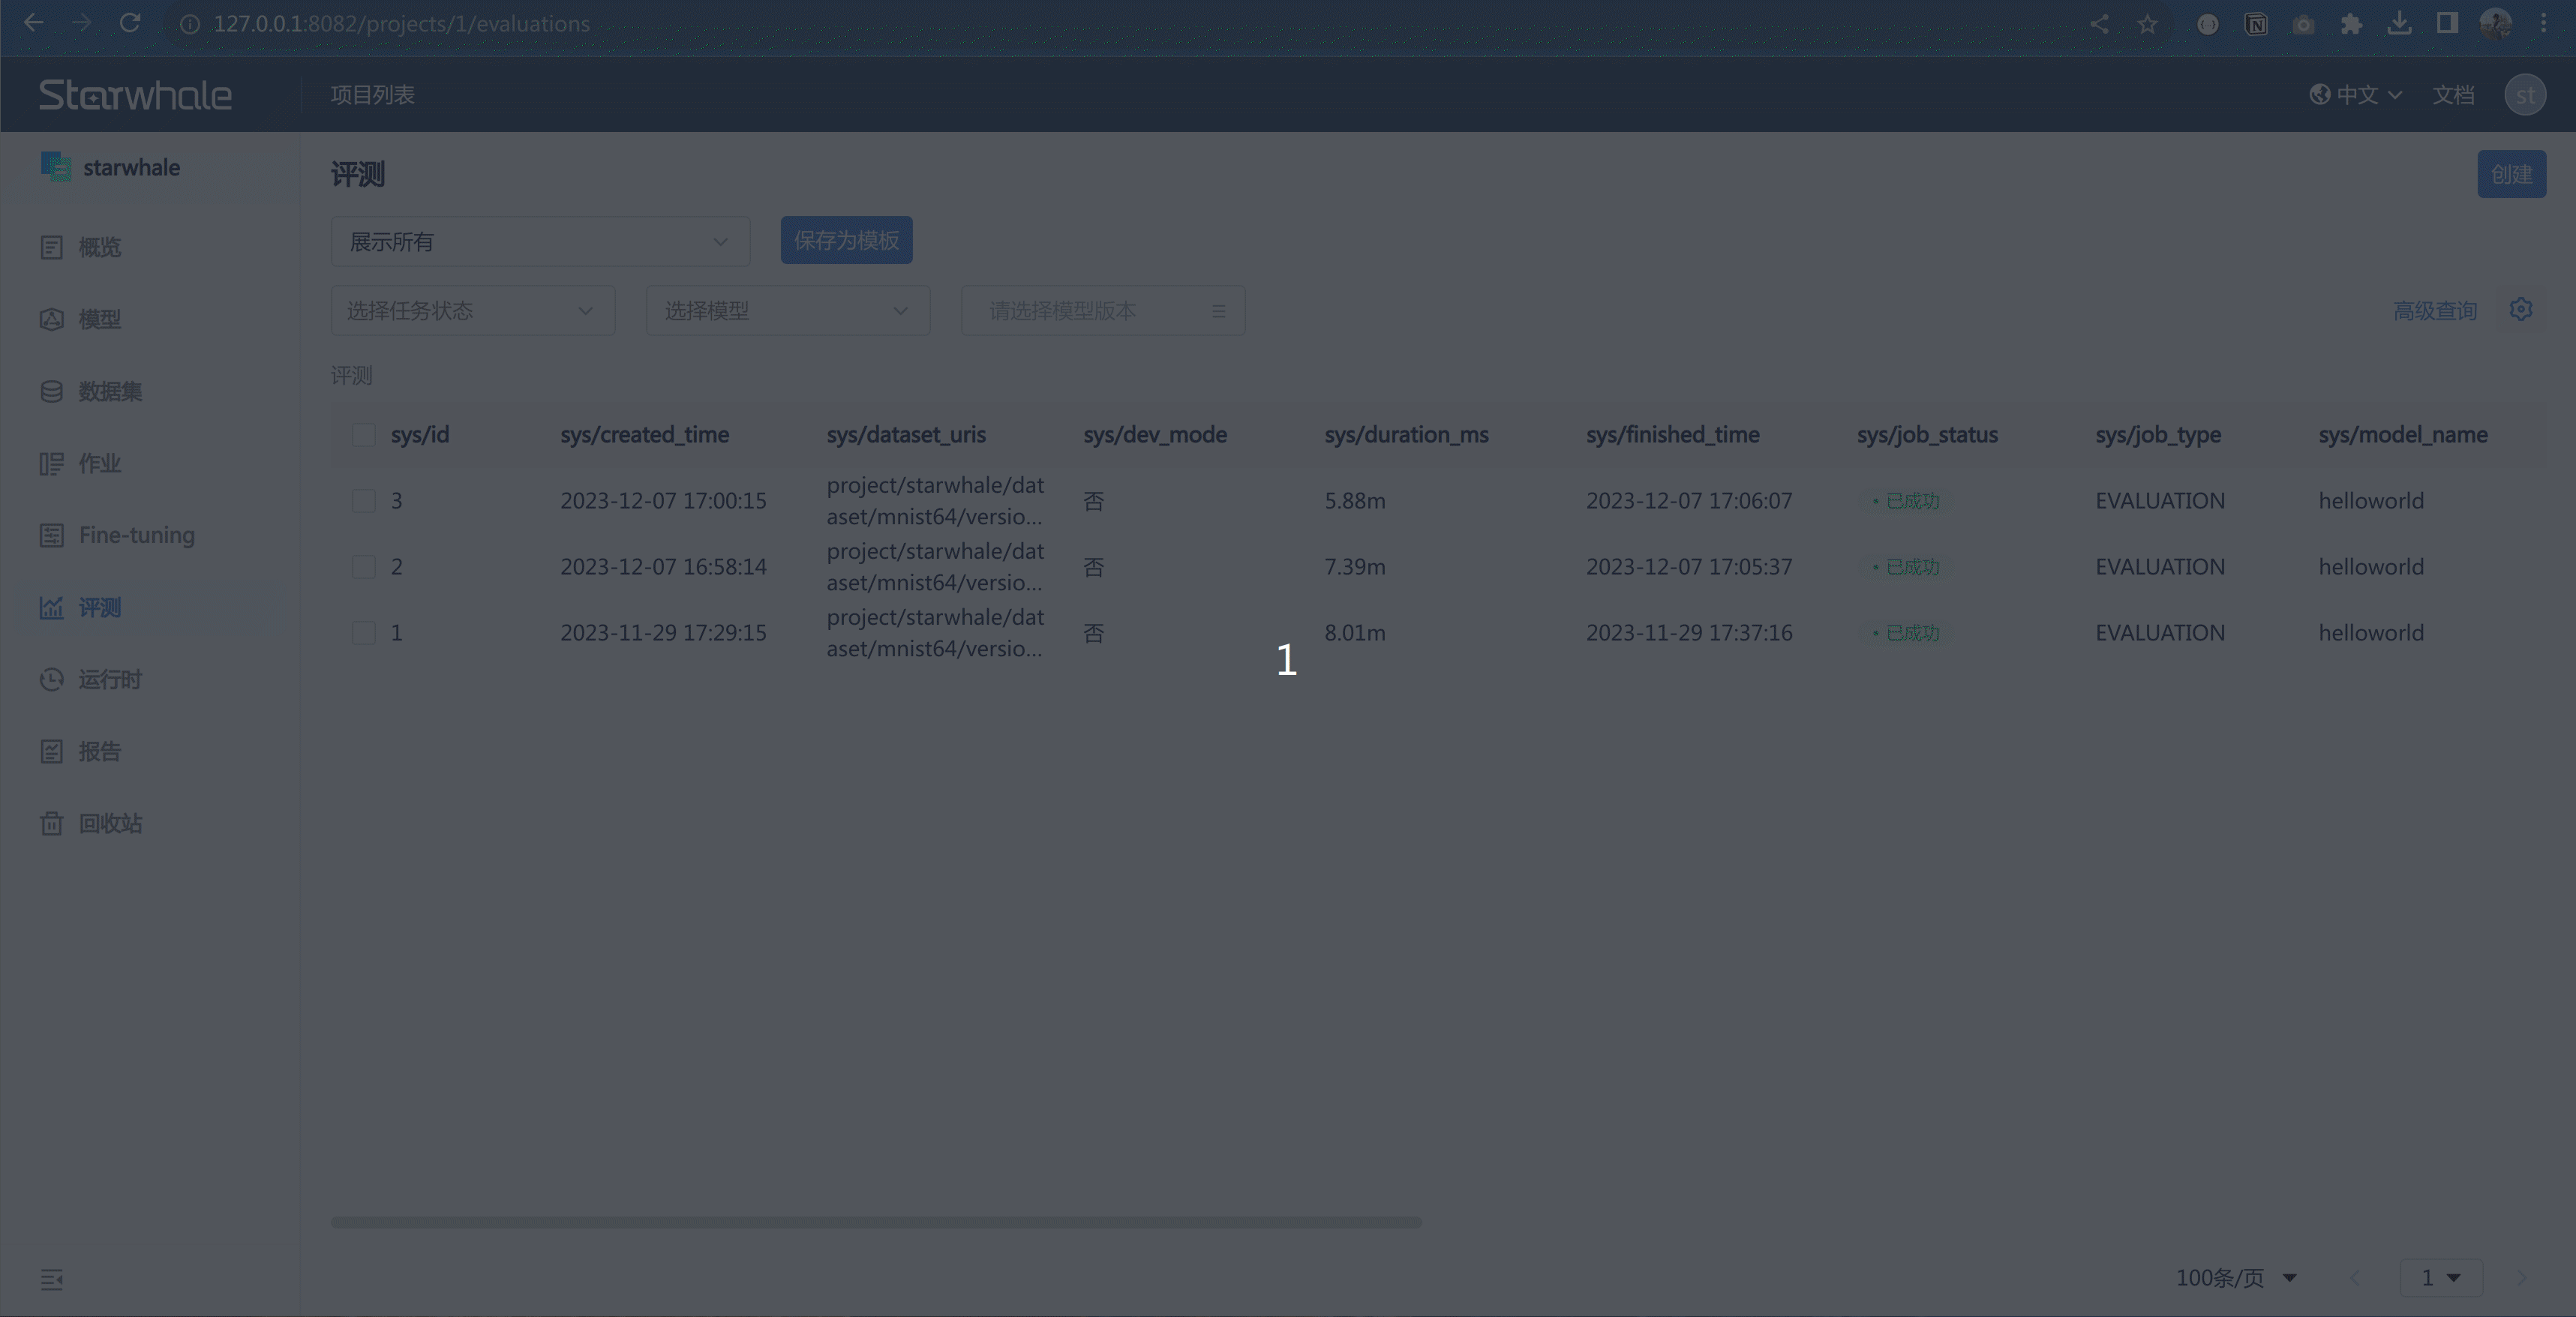
Running model evaluation in Starwhale Server
On the evaluation page, you can select the model, runtime, and dataset to perform the evaluation.
Comparing evaluation results
Starwhale provides rich features for comparing and visualizing evaluation results. You can select relevant evaluation results on the evaluation page for comparative analysis.
Congratulations on completing the Starwhale Helloworld example!